A month ago I started the second to last course and it's actually a sort of phase called 'Specialisation'. I've mentioned this phase in a post before because I wanted to address some of the ideas I had for it. Unfortunately most of these ideas where really not executable because they either were incredibly over-scoped for someone still needing to learn everything; and secondly, they really didn't coincide with the intended learning goals. It's less about making a product and more about learning the bumpy road towards it; at least that's how I understood it.
So that's where I started studying kind of everything related to VFX workflow. I bought books and subscriptions to bring structure to my learning progress. I've set up a heavy duty roster so I can easily see what 'classes' I am taking on which day and at which time; including what chapters I should read and which I can skip... Writing and reading this aloud it sounds a little silly but it's definitely helping me progress a lot faster than I anticipated. So far it's a pretty solid ride.. and I guess now it's time to show some stuff.
Unfortunately I can only show the stuff I made this week because everything from the past 4 weeks is currently only on 2 drives, both of which are not accessible at this time. One is being used to render out a 400 frame sequence for a presentation next Wednesday and the other is at home - I am in Ghent. So here goes.
 |
| Swolla at around 1650. This is what I want to make into a scale model. |
Modeling Progress:

I started out with a design of Zwolle, a Dutch city in Overijssel. I used the old inner city as example, called Swolla, and drew a rough illustration of where the rivers, roads, walls, etc would be. Stylized of course because I want to create a scale model. In dutch that's called a "Maquette". In the image above I've started creating polygonal meshes to resemble the design.

Trying to get a feel for the Maquette. At this point I wasn't sure why it didn't work yet as a scale model. The extruded part didn't make it feel more convincing but I figured it had something to do with shaders and a sense of scale; something that's completely missing here. I did figure out what colors I wanted everything to have.

For this ugly image I used a random city generator MEL script I found on Creative Crash but I wasn't happy with it at all. It started looking like an industrial area or a large city with highways running through it and monster rivers flowing on each side. Totally broke the feeling of a old city. I did make the bridges a little prettier.

So I created meshes around and overlapping the roads; effectively creating a much cozier environment. I also took some open source buildings from 3D Warehouse created in Google sKetchup and cleaned them. I had hoped this was quick, but it only turned out to be very dirty. Normals pointing in all direction, un-closed meshes and locked UV sets however, it's really good stuff nonetheless.

Another shot of where I figured I had added enough detail. At this point I used a small script to randomly select faces on the buildings to make chimney's and scale them accordingly.
I also did some really easy rigging. I mean.. really easy.
Shading Progress:
 |
| Camera (AA): 3 ... Back lighting: 0.25 ... SSS: 0.1 ... Light passes: 3 |
For this I took a small selection of the Maquette so I could cut down on render times so I could quickly iterate between attributes and values. I was trying to get papery / cardboard kind of feel to the models. After some research this was actually fairly easy to achieve as it's mostly back lighting and some sub surface scattering. Next to that I was trying to cut down on render time by reducing the multiplier in the Arnold render settings but also light passes, for softer shadows.
 |
| Camera (AA): 4 ... Back lighting: 0.75 ... SSS: 0.25 ... Light passes: 2 |
In this image I cut down render times by 50 percent and managed to increase the subsurface scattering. The back lighting in this image is increased by a factor three which in turn makes sure all the surfaces are lighter and have bright spots where the distance to the next side is smaller. For the time being I was happy with this result and decided that maybe a displacement map or bump map would make it more convincing, but as you can see from the images they made it worse. Although this is just a 'funny' stab at how it looked at one point, I really couldn't get those to look right.

Terrain shader set up and bump map still applied to the rest of the objects. I quickly realized that even the smallest crack in anything resulted in the material definition being completely off from what I wanted it to be.

At this point most of the shaders were done and I called it quits. Here I tried out the focal distance option in the Arnold camera attributed and attached it to a measure distance node, which in turn would be attached to two locators, both of which were constraint to the camera settings. This way I can move the camera and focal point around and my focal distance will automatically shift. I'm thinking about using NURBS curves and animating locators along those curves to avoid having to manually change things.
Rendering progress:
I'm trying to become accustomed to separating my scenes into separate ones where I eventually use the render scene to reference all the one's holding shader, polygonal and others sorts of information. I feel this works best and keeps the working environment clean.

Testing shadow catcher in my render layers according to the support files provided by Arnold.

Testing shadow catcher in combination with a clean plate I created of the living room floor. I managed to get the reflections right for what I wanted and prepare the scene for HDR image lighting. The right ball in this case is a chrome one to check the reflection. This is simply following another part of the Arnold support file.

HDR image reflection in the chrome ball and a change of coloration in the entire scene. The reflections are accurate and the lighting is almost identical to the recording circumstances. I set up another lighting scene to help with the appropriate discolorations due to spill light caused by blinds and a construction light. This should neutralize all the incorrect lighting.


In the above four images I was trying out render settings. Like in the images above relating to shading I removed render passes for lights and tested the difference in duration for different kinds of lights (directional against area lights etc). I found that, against my expectation, the skydome is actually a really fast and accurate way of lighting. I stuck to that and added lights to keep an interesting image but optimized for rendering at the same time.


0m42s - 0m50s

1m21s - 1m32s


1m49s - 1m59s
EDIT: apparently Google is awesome and automatically made a .gif of the previous images!
 |
| Awesome .gif |
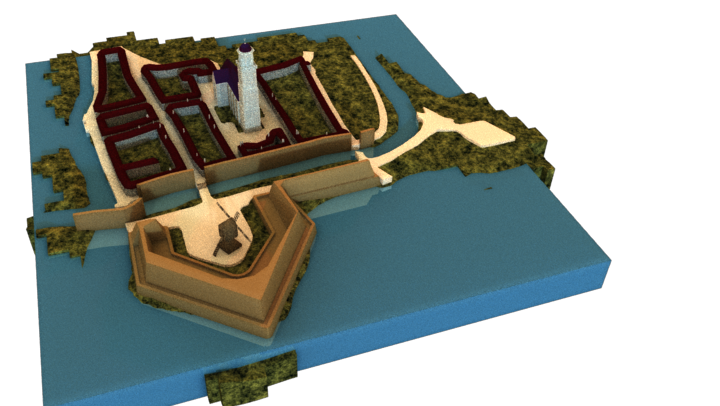
Where I am currently:

As you can see I decided not to keep either of the two previously shown shapes and collection of scale models. I didn't understand at first why my Maquette wasn't feeling like a one and I think the reason for that is because Maquette nearly always just cut off the terrain. They're not keeping into account all the other stuff because it's really just not interesting enough to see. So that's what I did; Boolean-ed my way through hundreds of meshes, repaired all of them, UV'd them again and textured the cut up parts.
The lighting in this image is not final yet, but has to do for now because next week I'm going to dive into simulations. Fluid, smoke and fire. According to my roster (hehe) I have three weeks to learn and apply.
This is also the model that I am currently rendering for a presentation next Wednesday. The windmills (5 in total) are rigged and animated so it's not a completely static scene. Some things are still missing and I'm currently in the process of adding some final touches. In this case that's guard towers, benches and some fences.
I am also quietly thinking about redoing some of the footage I've shot. I talked about it with an ex-colleague and we kind of came to the conclusion that it might be much more interesting to shoot for action in the digital scene instead of just moving the camera around for 20 seconds. Still just food for thought.
Asterix!
Yes! Finally a trailer that is actually official. You'll see it also says in the title. It's 2 minutes long and no subtitles unfortunately, but really, you'll get what's going on without knowing a word in French.
That was it again. Hope you enjoyed that wall of text,
Pim