Thursday, December 19, 2013

Intership and Animation

It's been a while since I updated and let's just start with the big update first. I tried putting off writing this anywhere since nothing had been finalized yet but I guess it's official now. I'll be interning as a VFX artist at Grid-VFX in Ghent! My contract was signed last week. I'm really excited to work on some of the projects they're running with! I also found a place to live only two days later. I guess I got really lucky with that one.


As for what I am working on right now; it's a short animation supposed to last between 15 and 20 seconds portraying a change in attitude. I'm using the Max for Maya rig which animates like a charm. Nothing new there. As of yesterday I've finished blocking out poses and am fixing the interpolation on a grand scale in the graph editor. I'm getting some weird rotations and translations from only one arm and the head. The rest is working fine.


For this animation I am trying to challenge myself by making an animation for a drunk guy. It's about 100 frames of alcohol induced strolling but I really want to get it right. Below is my block out. So far I've worked out about half of it. Still the blocking phase though.


In other news, I've been fooling around in Nuke but nothing substantial has come from that. Fun program; need to learn more.

Kind regards,
Pim

Monday, November 18, 2013

A day's work

I'm still working on finishing up my final retakes. After that, hopefully, I'll be able to do my internship. I've sent out several application letters with my updates portfolio and art reel I made about a week ago. So far I've only received two replies of which one invited me over this week. Exciting!

Today was a regular Gamelab day so I worked on props because that is what the 'game' needs. I can't say much more about it but I guess I can show off a few quick ones. Used a hipster post processing effect and a little depth of field. Also, I realize I forgot the hammer for the gun. Will add next week!


I also re-uploaded my art reel as both Vimeo and YouTube seemed to have issues with the .mp4 h.264 codec. The issue was explained on one of the threads on the Vimeo forum. Whereas most formats are simply accepted and altered according to the YouTube and Vimeo processing system, anything using the h.264 codec is cut in both brightness and darkness directions. So if your videos covers a 0 to 255 white value the processing system will cut 16 values off of both ends and stretch the newly created graph to the maximum values. In other words, it washed out the whites and the blacks when it's fully processed. So I rendered it to a 22gb .avi with a YUV-60i index and it turned out way better than I expected. Hardly any color difference, no white balance issues, sharpness is up to par with the original video and the frame rate -although cut in half- is still quite acceptable.


Kind regards,
Pim

Wednesday, November 13, 2013

Demo Reel 2013

Threw this together last night and spent the rest of the night uploading it to Vimeo. I also uploaded it to YouTube but the compression makes it look crappy and blogspot won't allow me to change the size of the embedded video when I directly input it from my YouTube account.

So here's the Vimeo upload.


Kind regards,
Pim

ps. Also spent the night updating my portfolio.

Sunday, November 3, 2013

Red Skull - Game Ready Character

After finishing the topology for all the different meshes and baking all the textures out separately I of course ran into numerous issues like ultimately forgetting to actually bake the laces to the mesh and adding volume to the aesthetical be-hind of the character. The eyes were also not amazing so I brutally moved some vertices to get those the way I wanted them. Less almond shapes; more actual eye shape.

What I did eventually was model the laces out individually and bake them down to a single plane, which I subdivided over the length of the boot. This turned out to be a little bit tedious to get right but was totally worth the effort as (in my opinion) it actually looks better than baked down laces.

After I finished the character for my course I did a quick polypaint and baked down the vertex information using xNormal to the individual assets my character still consisted of. Below is an example of the polypaint. For the tattoo's I made several different alpha maps which I used as stencils in Zbrush. Quick drag and drop.

Screen snip from the Zbrush viewport.

Quick render from Marmoset with some hipster post-processing effect.

T-Pose Turntable

The turntable above is the one I posted to the Lunchcrunch facebook page. Didn't get any feedback, but that's okay. I got 6 likes. Worth it.

After fixing some of the issues related to the mesh and textures I went back into Maya to create a small IK rig to pose the character in a few characteristic stances. Skinning was a little harder than I wanted it to be as I was experiencing a lot of stretching and errors while posing. In the end I decided to simply pose the rig and paint out the stretching and twisting that was occuring. I like to think I managed.

For each pose I made one or two renders and a small turntable. Mostly because it was part of the assignment; partly because I thought it was fun to play around with some of the functionalities Marmoset Toolbag has to offer.

Red Skull at attention.
 At Attention Turntable

Red Skull looking at the Life cube he has to carry around all day.
Michael Bay co-produced these  images.
 Life Cube Turntable

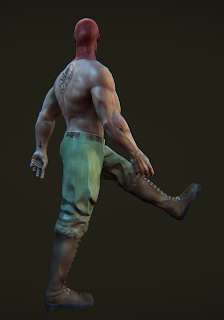
For this image I couldn't lift his leg all the way up since the stretching would be too bad.
Second image of the marching pose.

Marching Turntable

That was it for the long blog post. I'm off working on another project and that one also needs a lot of work.

Kind regards,
Pim

ps. Apparently I'm doing this blogging thing for a year now. Sweet. Also, I tried this out in Verold.


Sunday, October 27, 2013

Red Skull - Sculpt Finished

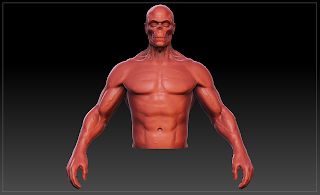
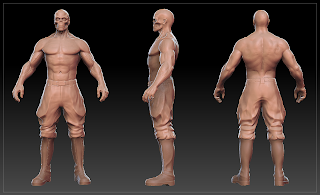
I figure there's not a whole lot more to cover about this character so this blog post will just be a collection of quick snips from each subtool. Tomorrow I'm going to start retopologizing this guy and hopefully get some quick bakes done before the end of the day. The deadline for this project is the 4th of November so I guess I'm in okay shape to finish it before that date.

The boots. I'm going to make the laces using deformers in Maya.
The shoe sole is a separate subtool.

Jodhpurs; horse riding pantalons.
Belt and buckle are separate subtools.

Front view in perspective mode.
I'm still considering adding a tongue and teeth.

Arm. Center image is isometric.
For the hand I used my previous sculpt and made it skinnier; as if burned and then healed.

The face. Might still add a little more volume to the cheekbone and eyebrows.

The belt and buckle. Spent very little time on this.

The back muscles. I'm pretty proud of this area.
It took a lot of iterations to get some of those muscles right. Very undefined area.

Overal feel of the character.

Kind regards,
Pim

Tuesday, October 22, 2013

Red Skull - Face & Tweaks

Since my last update there's been a small holiday combined into a lot of work spent on my Houdini project and documentation; something I might upload in the near future but for now that stays under the radar. It's far from finished and it looks like nothing yet. This is one of those things that either looks awesome or doesn't look like something at all.

Overal feel of the character so far.

I finished the lower arms and interior of the upper arms together with some reworked on small details in the abdomen area. If I have time left after doing the final pass over the body and rework the details in that I will spend more time on the pants. Right now they just don't feel like actual floppy, puffy pants to me. Can't put my finger on it entirely. Perhaps the issue is fixed once I push the folds inside the boots.

Arms.

The wrists still look a little thin to me. They're lacking volume and some muscle definition. I'll add that once I'm happy with the face and head. Also, please notice I am not trying to go for hyper realism; something I showed in my first post about this character. It was done very well by 3D Total and I'm trying to move away from that.

Face front and side.

This is my progress for just today. I downloaded a regular skull from some website but found it to be anatomically inaccurate so I ended up using the 'averageman' skull from Zbrush. I was planning on using it anyways but I felt there were some inconsitencies about it. The eye holes seemed out of proportion compared to the zygomatic and the chin. Regardless, I used it as a placeholder to shape up my body mesh and continue sculpting from there. So far I've been able to add detail using only the subdivision levels I already instigated for the mesh body. Tomorrow I'll give it it's own layer and continue adding more details.

Head without flow into the body.

Will fix the flow of the skull and it's muscle-ly texture tomorrow. Will sleep first and look at it with fresh eyes.

Kind regards,
Pim

Thursday, October 10, 2013

Red Skull - Pants & Boots

Simply updating my work on the Red Skull sculpt. I'm following two other pretty intensive courses so progress is much slower than I would like it to be. Regardless, I fixed most of the symmetry in the body. Right now I still need to fix the lower arms and the head. I'm thinking about using the basic skull featured in the default Zbrush sculpt "AverageMan". It has a great topology and it features no muscle structure whatsoever. Exactly what I need for my stylized version of Red Skull.

Felt like going for a different shader this time.

I've been working on the pants a lot which are almost finished. The folds are pretty much done, though they still need to fold into the boots which will cause more folds. Rinse and repeat.

Close up of the pants and boots.

The boots are a work in progress as the tongue doesn't make much sense yet. I found that Red Skull is illustrated with use of many different footwear. Either the illustrators or Red Skull himself must be very aware of trending boots ;). In any case, I didn't like many of the different shoe and boot designs he was drawn with so I figured I'd combine some of the concepts and work them into a boot I actually did like. Below are the three design I liked best. All three are pretty similar to boots that already exist though I think actually drawing them significantly helped me visualize them more accurately in 3D.

Three preferred boot designs.

As you can see from the first two I decided to make the last boot of the three. As for my reasoning; even though (Ultimate) Red Skull has taken the cloned body of Captain America in the comics I found the first boot too 'American' and too "in your face" for the passive aggressive style Red Skull applies to his tactics. The second boot looks too much like actual Nazi shoe wear; something I am actively trying to avoid. It's not that I don't like the Nazi boot; quite the opposite actually. It's just that 3D Total's rendition (to be found in an older blog post or simply Google it) features the same kind of boots and I want my version of Red Skull to be viewed and judged independently.

Kind regards,
Pim

Wednesday, September 18, 2013

Red Skull Character Sculpt

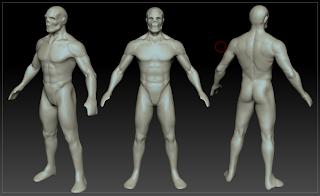
I picked up on the character sculpt from a little while ago. I believe it was the 6th of September when I touched Zbrush for the real first time and I've consistently felt more and more comfortable using it to the point where I'm right now (read; I feel very comfortable with my tablet).

Today I worked on getting my Dynamesh sculpt from the bulky mess it was to a well structured and well proportioned mesh in which I am using polygroups and various new materials I had the privilege of receiving from a fellow student.

My progress for the day.
The back has given me so much more trouble than I anticipated. For every muscle I blend in another feels awkwardly posed; continue this pattern until you find a compromise. Tomorrow should offer enough time to fix the back and get started on the legs. I'll be replacing the stumps at the end of each arm with an opened version of the hand I created earlier.

Also, after playing some pool I decided to snip some screens and paint over them using other reference than I've been using today so maybe I could figure out why some shapes were bothering me more than others. Results are below.


Kind regards,
Pim

Thursday, September 12, 2013

Hand game model

Today I baked the normal, cavity and ambient occlusion map using Xnormal and fixed some of the losses of volume in the hand when I rebuilt it in Maya. After a visual comparison I decided the maps would do and I continued to polypaint my Zbrush model.

During polypainting I found that using the standard brush left me unsatisfied with how the skin looked. It resembled the material definition of a plastic bag pulled over -in this case- a hand. So I changed brush to the ClayTubes brush and started applying a 'van Gogh'-like way of texturing; continuously softly hitting my tablet. The results were way better.

Comparing volumes.
Left model: 1.8k tri's | Right model: 2,000k tri's

Results of polypainting.

I used different functionalities within Zbrush and various programs to export my polypaint to a texture map and found that using the GUV tool in the UV Map menu worked best and most stable. It creates a temporary UV set for the high resolution model which you can use to project the polypaint to. Then flip the vertical vector and export. After that add it to Xnormal and bake the base texture. Voilá.

Mental Ray render.

I'll be working with Houdini FX for the rest of this week.

Kind regards,
Pim

ps. Video made in Marmoset Toolbag to retain the 'game' aspect of the model.

The artifact is something I get when I record 1/1 using the Marmoset video recorder.
1/2 fixes it though, but the resolution is cut in half.

Wednesday, September 11, 2013

Hand sculpt finished

I finished up on the sculpt this afternoon and started playing around with Zremesher but found it frustrating to work with. The Zcurves are a wonderful thing but they produce a model with strangely circling edge loops that run across the entire length of a cylindrical object (like the fingers and wrist). Although I tried many times to add more Zcurves to get rid the spirals they persisted on even the lowest polycounts. It also gave me uneven rows on the front side of the fingers that ended up with ugly triangles causing light to bounce off at an unnatural angle.

Finished hand sculpt at around 1 million triangles.

Deciding which polycount would retain the silhouette best.
Left to right; 1.2k to 4k triangles.

So what I ended up doing was importing the high poly model at a few levels lower and constructed a mesh around it using Maya 2013. Below is the finished low poly model. It's around 1800 triangles; well within the polygonal limit for this assignment.


Kind regards,
Pim

ps. added picture for Zcurves (maybe I'm doing it wrong)

Tuesday, September 10, 2013

Sculpting a hand (continued)

Decided to continue working on the hand I presented in my previous blog post.

I was working with dynamesh but since  more control = more better, I decided to work with detail levels. So I ran the model through Zremesher (also to clean up some of the triangles; they were giving me a hard time). Then sculpted over the entire surface to increase muscle tension, tendons and pointy bone structures. And finally cleaned it up.

Right now I'm still not entirely satisfied with how the proximus phalanx of the thumb connects with (close to) the wrist in the fourth picture. The bone seems to have a weird angle there. Will fix soon.


I haven't made any progress on the big guy but as soon as I finished this one I'll continue with that.

Kind regards,
Pim

Friday, September 6, 2013

Sculpting a hand

I've been putting this off for a very long and I've filled my time with all the other retakes I still had to do... but as of this week it is really happening. I'm going to use Zbrush and I'm going to feel comfortable using a drawing tablet before the end of next week.

So far I've been mostly just playing around in Zbrush with shaders and basic proportions for limbs. My room mate Frederik has been an amazing help with that. For next week I need to finish a hand; sculpted and optimized for a game engine. So far I've spent a few hours on getting the proportions right but I'm noticing I'm gaining speed.


Next to this I've started working on a full body model because for the end of this Block I need to have created a character optimized for a game engine. I've chosen Marvel Comics' Red Skull to recreate. I've seen 3D Total have done an incredible rendition of his persona but I'm tempted to not go for the hyper realism they've presented him with. I really like the 'Ultimate Red Skull' created by Leinil Yu and printed in Ultimate Comics: Avengers #1.

Below is my progress. As far as I understand Red Skull has cloned Captain America's body and placed his own head on it. This is easier for me as I can simply use an athlete's body. It is still very very wip.


 Some of the stuff in this sculpt (skull) was not my work.

More stuff to come.

Kind regards,
Pim

Sunday, August 4, 2013

Complex rig and animation

Past May I started building a complex rig for a warrior model provided by one of my teachers. I barely finished it before going to America and I forgot most of the important stuff when I returned to my work to start skinning the rig to the mesh.

Old image of a broken rig. It works pretty swell now.

I managed to pick up on rigging within a few days of watching tutorials by Digital Tutors and fixed several issues regarding the elasticity of the spine, shoulder-pads and jumpy transfob
rmations when switching between the IK and FK arm rigs. They're still not perfect but they work decently. The short legs did give me some trouble while animating but I figured if I just dropped the character's center of gravity it would do the trick just fine.

Several poses for a run animation.

Golden poses for the fight animation.
(I decided to do this traditional because I can't get proportions right with a mouse or tablet)


Also...

I didn't mention this earlier but I am also currently involved in a Star Wars mod for Mount & Blade. We're an international team of currently only 3 people; at the height of the project we were with 11. The mod itself has a 9.5 average rating over 1000+ submitted votes. The only downside to it is that the engine can't handle 10k+ polycounts, 512px+ texture sizes, custom built rigs or interesting shaders so it's really not very interesting to post images about it here.

Kind regards,
Pim

[edit] Updated this blog with some more stuff.